ジェネラティブエージェンツの大嶋です。
「AIエージェントキャッチアップ #40 - Motia」という勉強会を開催しました。
https://generative-agents.connpass.com/event/361504/generative-agents.connpass.com
アーカイブ動画はこちらです。
Motia
今回は、API・イベント・エージェント向けの統合的なバックエンドフレームワーク「Motia」をキャッチアップしました。
MotiaのGitHubリポジトリはこちらです。
今回のポイント
Motiaとは
Motiaは、API・イベント・AIエージェントを統合したバックエンドフレームワークです。 JavaScript、TypeScript、Pythonなどを使って、イベントドリブンなワークフローを実装できます。
通常のバックエンド開発では、APIサーバー、ワークフロー、バックグラウンドジョブなどを、それぞれ異なるフレームワークやランタイムで実装する必要があります。 Motiaはこのようなスタックを1つのフレームワークで実装できるようにすることを目指しています。
Motiaの主な概念
Motiaの最も重要な概念は「Step」です。 その名の通り、ワークフロー中のステップを指します。
Stepのトリガーには以下の4つがあります。
- API Step: 外部システムからのHTTPリクエストでトリガー
- Event Step: Motiaシステム内の特定のイベントでトリガー
- Cron Step: スケジュールに基づいてトリガー
- Noop Step: 外部プロセスや手動タスクのプレースホルダー
Quick Start
実際にMotiaのQuick Startを動かしてみました。
まずはMotiaのプロジェクトを初期化します。
npx motia@latest create -n <your-project-name>
続いて、stepsディレクトリにHello WorldのStepを実装します。
exports.config = {
  type: 'api', // "event", "api", or "cron"
  path: '/hello-world',
  method: 'GET',
  name: 'HelloWorld',
  emits: [],
  flows: ['HelloWorld'],
}

exports.handler = async () => {
  return {
    status: 200,
    body: { message: 'Hello World' },
  }
}
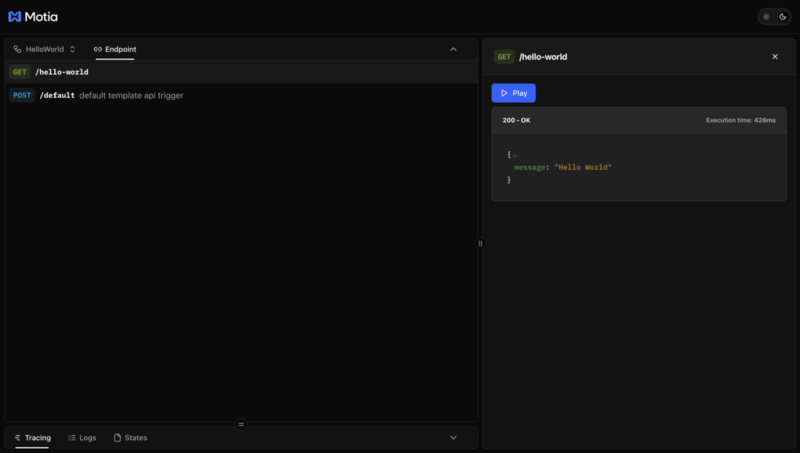
これで/hello-worldへのリクエストに対して、{ message: 'Hello World' }という応答を返すようになります。
npm run devでサーバーを起動してアクセスすると、HelloWorldのFlowが表示されました。
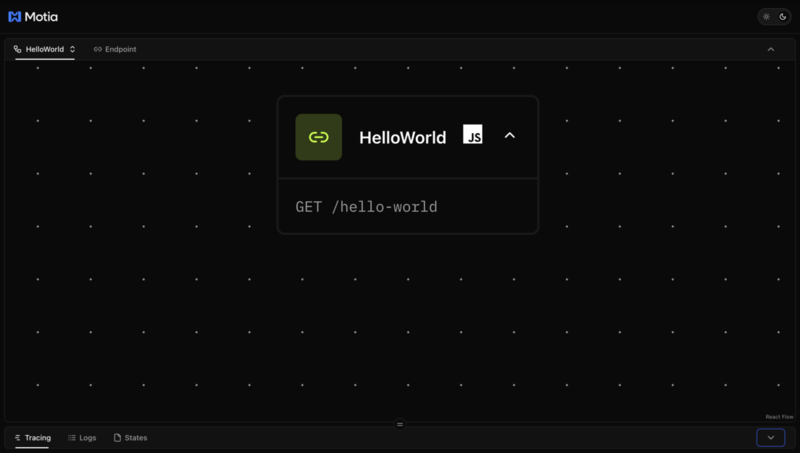
画面上から、/hello-worldへのリクエストを試すことができました。
ディープリサーチの例
Motiaでは、motia-examplesというリポジトリで、様々なサンプルが公開されています。
その中から、ディープリサーチの例を動かそうとしてみました。
示されている手順の通り進めていくと、以下のようにディープリサーチのFlowが表示されました。

なお、この画面はあくまでコードで実装されたワークフローを可視化するものであり、ノーコードでワークフローを実装する機能はありません。
残念ながらリサーチの終了までうまく動作しませんでしたが、Motiaの雰囲気は感じられました。
ディープリサーチの実装の概要
Motiaのディープリサーチの例は、以下の9つファイルに実装されたStepで構成されています。
- analyze-content.step.ts
- compile-report.step.ts
- extract-content.step.ts
- follow-up-research.step.ts
- generate-queries.step.ts
- report-api.step.ts
- research-api.step.ts
- search-web.step.ts
- status-api.step.ts
参考: https://github.com/MotiaDev/motia-examples/tree/main/examples/ai-deep-research-agent/steps
たとえばリサーチ開始のAPIのStepは、以下のように実装されています。
export const config: ApiRouteConfig = {
  type: 'api',
  name: 'Deep Research API',
  description: 'API endpoint to start a deep research process',
  path: '/research',
  method: 'POST',
  emits: [{
    topic: 'research-started',
    label: 'Research process started',
  }],
  bodySchema: inputSchema,
  flows: ['research'],
}

export const handler: StepHandler<typeof config> = async (req, { logger, emit, traceId }) => {
    :
  await emit({
    topic: 'research-started',
    data: {
      query: req.body.query,
      breadth: req.body.breadth,
      depth: req.body.depth,
      requestId: traceId
    },
  })
    :
上記のStepでは、research-startedというtopicをemitしています。
research-startedというtopicは、generate-queries.step.tsのStepがsubscribeしています。
export const config: EventConfig<Input> = {
    :
  subscribes: ['research-started'],
    :
}

export const handler: StepHandler<typeof config> = async (input, { traceId, logger, state, emit }) => {
  logger.info('Generating search queries for research topic', input)

  try {
    // Use the OpenAI service to generate search queries
    const openAIService = new OpenAIService()
    const searchQueries = await openAIService.generateSearchQueries(input.query, input.breadth)
      :
このように、各Stepがtopicをemit・subscribeすることで、ワークフローが構成されています。
MotiaのGUI(Motia Workbench)は、このように実装されたワークフローを可視化するためのツールということです。
State
Motiaでは、Stepの間でデータを共有できる「State」という概念があります。
以下のようにして、Stateを保存できます。
export const handler: StepHandler<typeof config> = async (input, { traceId, logger, state, emit }) => {
      :
    await state.set(traceId, 'searchQueries', searchQueries)
    await state.set(traceId, 'originalQuery', input.query)
    await state.set<ResearchConfig>(traceId, 'researchConfig', {
      breadth: input.breadth,
      depth: input.depth,
      currentDepth: 0
    })
      :
保存されたStateは、以下のようにして取得できます。
export const handler: StepHandler<typeof config> = async (req, { logger, state }) => {
      :
    const originalQuery = await state.get(requestId, 'originalQuery')
    const researchConfig = await state.get<ResearchConfig>(requestId, 'researchConfig')
    const finalReport = await state.get(requestId, 'finalReport')
      :
MotiaのStateは、デフォルトではファイルに保存され、設定次第でインメモリーまたはRedisに保存できるようです。
次回のご案内
以上、今回は「Motia」をキャッチアップしました。
次回は「AIエージェントキャッチアップ #41 - Awesome Claude Code」ということで、Claude Codeに関するOSSなどをキュレーションした「Awesome Claude Code」がテーマです!
generative-agents.connpass.com
ご興味・お時間ある方はぜひご参加ください!
また、その次の回以降のテーマも募集しているので、気になるエージェントのOSSなどあれば教えてください!